What is Drip Tubing?
Drip tubing is used in the delivery of water directly to the roots of plants. Specifically, drip tubing is made from polyethylene and has emitters that are placed at intervals along the tube that correspond with the placement of each plant. This ensures that water is delivered directly to each plant’s root zone. Irrigating in this manner is not only very precise and efficient, but it also conserves water because of the low flow-rate that is required.
In arid locations, drip irrigation is an essential method of maximizing water usage and has been a standard for centuries. There is even evidence that ancient civilizations used clay pots that were buried in the ground as a primitive method of drip irrigation. The pots would be buried near plants and filled with water. Over time, water would slowly seep from the pots and into the soil. In this manner, each plant received a constant and direct source of water.
What Does Drip Tubing Do?
 Drip irrigation, via the use of quality polyethylene drip tubing, is both an economical and efficient way to irrigate most forms of plant life. Due to the fact that this method of irrigation has an efficiency rate of over 90%, this is especially true in areas where water is scarce. Because of the low flow-rate and direct application to the roots of the plant, using drip tubing for irrigation also reduces evaporation and runoff. Drip irrigation, via the use of quality polyethylene drip tubing, is both an economical and efficient way to irrigate most forms of plant life. Due to the fact that this method of irrigation has an efficiency rate of over 90%, this is especially true in areas where water is scarce. Because of the low flow-rate and direct application to the roots of the plant, using drip tubing for irrigation also reduces evaporation and runoff.
Drip irrigation is scalable and can be used for both commercial and residential applications. Drip irrigation also limits disease because the tubing is delivering water directly to the root zone of a plant. By minimizing water contact on the stems, leaves and fruit of a plant, waterborne disease is virtually eliminated. Using drip tubing for irrigation also keeps the rows between plants dry. This allows for easier access to the plant and reduces weed growth. Other benefits include less leaching of nutrients and water under the root zone and increased success over rough terrain.
When Should You Use Drip Tubing?
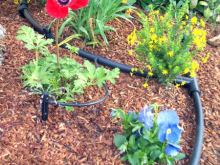
Drip tubing for irrigation purposes can provide benefits to nearly any type of agricultural endeavor. If you are a homeowner, drip irrigation provides an efficient way to water a multitude of different plant life from perennials in a landscaped flower garden to a backyard garden filled with fruits and vegetables. Drip irrigation is especially useful in situations where water usage may be limited or in locations where water is scarce.
Because of its flexibility, drip tubing can also be used for irrigating irregularly shaped or narrow areas. Drip tubing can be shaped to the contours of the rows of plants or landscaped areas.
Drip irrigation is also very useful during times of drought. In many cases, because of its efficiency, it may not be subject to water restrictions that are imposed during these times. Using drip tubing for irrigation is also considered a very “green” irrigation solution and as such it is an excellent way to conserve and even recycle water.
The Nuts and Bolts of Drip Tubing and Drip Irrigation
Now that you’ve decided to embark on a journey that involves drip irrigation, it’s a good idea to take some time to learn a bit about what you’ll need in order to develop your drip irrigation system.
What Sizes of Polyethylene Drip Tubing Are Available?
If you are a homeowner who is developing your own drip irrigation system, it is important to understand the differences in the sizes of drip tubing. It's especially easy to become confused about the differences in 1/2-inch drip tubing, and this can lead to problems with buying the correct size of fittings.
Drip tubing and polyethylene tubing both come in various styles and sizes ranging from 1/8-inch to 1.5-inches or even larger. There are differences between the OD (Outside Diameter) and ID (Inside Diameter). These differences are shown with this list of the most common sizes of drip tubing.
Polyethylene Tubing:
1/8-inch - .125" ID x .187" OD
1/4-inch - .170" ID x .250" OD
3/8-inch - .375" ID x .500" OD
1/2-inch polyethylene tubing is available in three different configurations:
1/2-inch - .520" ID x .620" OD
1/2-inch - .600" ID x .700" OD
1/2-inch - .615" ID x .710" OD
3/4-inch - .820" ID x .940" OD
1-inch - 1.060" ID x 1.200" OD
Drip Tubing:
1/4-inch - (5mm) with .170" ID x .240" OD
1/2-inch drip tubing is available in two different configurations:
1/2" - .550" ID x .640" OD
1/2" - .570" ID x .670" OD
Remember, with 1/2"-inch tubing that you need to have the and ID and OD that corresponds correctly with the size of fittings that you will use. If these sizes do not match precisely, there can be a wide variety of problems like leaks, blow-outs or stripped threads on fittings.
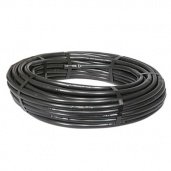
Drip tubing is normally sold in lengths of 100, 500 or 1,000 feet. It is black in color and has a high resistance to sunlight. In normal sunlight situations, drip tubing will last for about 30-years.
What Types of Drip Tubing are Available?
There are several different types of drip tubing that are available for a drip irrigation system.
Emitter tubing – For most drip irrigation systems, emitter tubing is the standard. This tubing allows for spot placement of water. In the case of factory-made emitter tubing, emitters are placed at even distances along the length of the tube. This type of tubing is a perfect choice for rows of evenly spaced plants. In custom systems designed for a landscaped area, emitters are manually placed along the tube to correspond with the placement of various plants.
1/2-inch distribution tubing – This tubing is generally connected to the main water supply and brings the water to the 1/4-inch distribution tubing, soaker tubing or emitter tubing.
1/4-inch distribution tubing – This tubing connects the 1/2-inch tubing to various types of emitters such as misters, emitters and sprinklers.
Soaker hoses or tubing - These types of emitters are porous hoses that can be connected directly to an outside faucet, rain barrel or garden hose. This type of hose can be laid around your different plants and water will seep from the walls of the hose and into the ground around it. The difference between soaker hose and drip line is that the delivery of water is much less accurate. You could compare a soaker hose to sweating because the water comes out along the entire length of the hose.
Soaker tape or drip tape - This emitter is similar to a soaker hose. It is made of either porous material or has hundreds of tiny holes along its entire length. The main difference is that drip tape is much thinner and in many cases will only last for one season. This tape can be used above or below ground and is very good for delivering water to wider areas that might need it. One example is within an area that has dense foliage.
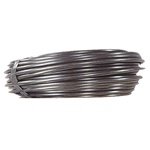
Micro tubing is another useful component for irrigation systems. This type of tubing generally comes in 1/8” and 1/4” sizes and it can be used as the main and sub lateral tubing for a drip irrigation system. It is also used to connect emitters. Micro tubing can generally handle up to 15 gph.
How Do I Determine What Type of Drip Tubing to Use?
A simple answer to this question is that it will vary depending on what your needs are. If the intended use of the drip irrigation system is for rows of crops in a garden or trees in an orchard, factory-made tubing with its evenly spaced emitters is the perfect choice. If, however, you are designing a system for a landscaped yard that has plants at various intervals throughout the entire yard, emitter tubing that requires manual placement of emitters is the correct choice.
If you decide to landscape your yard in a different manner each year, soaker tubing may be a good choice since it is something that requires annual replacement. The size of your irrigation zones will also factor into this equation. One of the most important things you should do is draw out a plan then use string to determine the proper lengths of the tubing you’ll need.
What Components Are Used in a Drip Irrigation System?
 |
|
 |
|
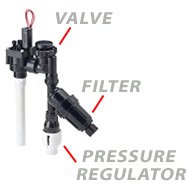
In a nutshell, there are several essential components in a drip irrigation system. Each system will require a main waterline, control valves, pressure reducer, backflow prevention, pressure regulator, filter, various tubing adapters and fittings, air vents, drip tubing, emitters, filters and an end cap or flush valve.
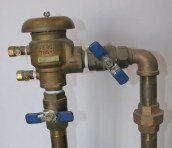
Main Water Line – This is the beginning of a system. In the case of a landscaped area around a residence, the main line is usually alongside the house and extends from the foundation or outside wall of the home. A main water line can also be run underground to a central point within your irrigation layout.
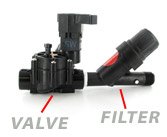
Control Valve – This component controls the flow of the water from the main water line or throughout the various areas of the irrigation system. Control valves may be operated manually or, with a bit more expense, may be automatic. Depending on the type of system that is installed, there may be one or more control valves.
Pressure Reducer or Regulator – Since many systems operate with maximum efficiency at lower water pressures, a pressure regulator may be required to help lower the water pressure coming from the main water line outside of a home.
Backflow Prevention – Emitters sit directly on top of soil or beneath soil. If water that has been emitted into the soil seeps back into the drip line and up to the main line, it may very well contaminate your entire water supply. In order to prevent water contamination in your main water supply, it is of the utmost importance that your drip irrigation system has a backflow suppressor.
 |
|
Filters – A filter with a 150-mesh or 200-mesh screen will help prevent the buildup of different minerals and particulates in the emitters. Filters will also protect the valves on your drip irrigation system.
Drip Tubing or Dripline – This is the tubing that has emitters installed on it. If you are using factory-preinstalled emitters, this tubing will have the emitters placed at the same intervals along the length of the tubing. Manually installed emitters can be placed at varying intervals.
If your irrigation needs are focused on plants that are spaced at regular intervals, dripline is an easy choice. This type of drip tubing comes in multiple lengths from 50-feet to 1,000-feet. In most cases driplines can be found that have emitters placed at 6-inch, 9-inch, 12-inch, 18-inch, 24-inch, 36-inch or 48-inch intervals. In some cases, depending upon the type of application, driplines may come with even larger intervals.
Air Vent – In order to keep air out of the emitters during the times that the system is shut down, an air vent should be installed at the drip tube’s highest point.
 |
|
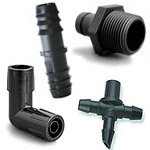
Drip Tube Fittings and Adapters – This equipment includes tees, couplings, adapters and ells. These are the components that are used to connect the drip tubes to each other and to control valves or the main waterline. It is important to note that the fittings should be the correct size for the tubing you use. In many cases, using the incorrect size fittings will result in a blowout.
End Caps and Flush Valves – In order to keep the water from just flowing out of the end of the drip tubing, it is necessary to have a flush valve or end cap. A flush valve is simply a valve that is placed at the end of the drip tubing. It is kept in the off position until the tubing needs to be flushed (generally once per year). An end cap is exactly what it sounds like: a cap that is screwed onto the end of the drip tubing.
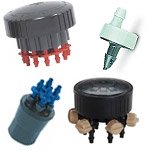
Emitters – Within the list of equipment needed for a drip irrigation system, we’ve saved emitters for last. Emitters are one of the most important components of the drip irrigation system. Emitters are basically small plastic valves that are installed along the length of the drip tube. The sole purpose of an emitter is to keep a continuous and uniform flow of water near the root zone of the plant.
There are two primary categories of emitters: pressure compensating emitters and turbulent flow emitters. Pressure compensating emitters are used in situations where there is a disparity in elevation of greater than five-feet. Turbulent flow emitters, also known as tortuous-path emitters, are used when the irrigation area is level.
 |
|
Keep in mind that all emitters provide some type of pressure compensation. However, a pressure compensation emitter, by definition, will keep the water’s flow-rate constant regardless of the water pressure. For instance, a pressure compensation emitter should keep water flowing at the same rate whether it is at a pressure of 1.0 bar (15 PSI) or 3.0 bars (45 PSI).
Strictly speaking, the main benefit of using a pressure-compensating emitter is that if you have an area that is hilly (with an elevation of over 5-feet) then pressure-compensating emitters will maintain the water’s flow-rate throughout the system. One thing to always be aware of is that, as a general rule, pressure-compensating emitters should not be used when your water pressure is very low.
As you can imagine, the flow-rate of a pre-installed emitter is one of the most important parts of the drip irrigation equation. Emitter flow-rates vary quite a lot, however, the most common flow-rates that are used for home irrigation systems are as follows:
2.0 liters per hour (1/2 gallon per hour)
4.0 liters per hour (1 gallon per hour)
8.0 liters per hour (2 gallons per hour)
When selecting the type of emitter, one item to be mindful of is the type of soil you have. The purpose of drip irrigation is to supply water directly to the root zone of a plant. In order to do this, the water needs to be absorbed by the soil immediately or it will evaporate or there will be run-off. If your flow-rate is too high, you’ll end up with excess water around the plant that either runs off or evaporates. Specifically, the higher the density of your soil, the slower your flow-rate needs to be. Soil that is high in clay, for instance, is very dense and tightly packed and absorption is very slow. From a practical standpoint, if you have loose, sandy soil, you should consider emitters that have higher flow-rates because the absorption rate will be much faster.
Rules of the Rows
When constructing your drip irrigation system, there area few things to consider. You might consider these to be the rules of the rows. The first thing to consider is the length of your mainlines and lateral lines.
Regardless of anything else you might learn about drip irrigation, the number one rule you have to consider is that the laws of physics always apply. This becomes incredibly important when considering the length of your mainlines and lateral lines. As a rule, the overall length of both cannot exceed 120 meters (400 feet).
Typical sizes for mainline and lateral lines can vary, but the following guidelines are relatively standard across all drip irrigation systems.
Flow Range in GPM |
Mainline Pipe Size |
Lateral Line Size |
| 0-3 |
1/2” |
1/2” |
3-6 |
3/4” |
1/2” |
6-10 |
1” |
3/4” |
10-20 |
1-1/4” |
1” |
20-30 |
1-1/2” |
1-1/4” |
Drip tube length is another consideration to factor into the overall design of the irrigation system. The overall length of the drip tube cannot be more than 60 meters (200 feet) from the water’s point of entry to the end of each tube.
When designing a system, the designer needs to take several things into consideration. Total coverage area, types of plants to be irrigated and type of soil are the major requirements have been determined you can select the proper hardware to ensure proper flow-rates.
How to Install a Basic Drip Irrigation or Sprinkler System
 Installation of a basic drip irrigation or micro sprinkler system is relatively simple. The first step is to design your layout based on what you’ll be using the system for. Once you’ve acquired the proper equipment, you can begin assembling the system. What follows assumes that you have the correct tools and equipment and are familiar with it. Installation of a basic drip irrigation or micro sprinkler system is relatively simple. The first step is to design your layout based on what you’ll be using the system for. Once you’ve acquired the proper equipment, you can begin assembling the system. What follows assumes that you have the correct tools and equipment and are familiar with it.
Step 1 – Attach the vacuum breaker to the pressure regulator. This will keep water from backwashing into your home water supply.
Step 2 – Connect your filter to the pressure regulator then attach the hose swivel to the opening on the side of the filter. Connect everything to your hose bib.
Step 3 – Lay your tubing out according to your design. Be sure that emitters are positioned so that they are close to the root zone of each plant.
Step 4 – Place ground stakes at intervals along your drip tubing to secure it into place. The hook at the top of the stake should fit over your drip tube.
Step 5 – Once all of your tubing has been laid out, install the correct sized pipe fittings and make sure to tighten them then attach an end clamp, end cap or flush valve at the end of your line.
Step 6 – Test the system. If you see problems within your system, this will be the time to fix them. Following are some simple troubleshooting techniques that can be used to fix a drip irrigation system.
Obviously, this is a very basic installation, but the same principles apply to larger jobs. Specifically, though, it’s a matter of careful planning and attention to detail.
Troubleshooting Your Drip Tubing Irrigation System
Q. No water is coming from an emitter, what should I do?
A. Clean the emitter or replace it depending on how clogged it is.
Q. The tubing or emitter has blown off, what’s wrong with my system?
A. Tube or emitter blow off is caused by too much pressure in the system. The easiest remedy is to add a pressure regulator to the line that is causing the problems.
Q. There are leaks between my fittings or between pieces of tubing. How do I fix this?
A. First, check the connections and ensure that they are tight. If you’re dealing with a small leak in the pipe, you can use a dresser coupling to fix the leak. For larger leaks, you may need to cut out the damaged section of the line, insert an additional length of drip line and use fittings to seal the connections.
Drip irrigation is a tried and true method for maximizing the efficiency of delivering water to your plants. Once you’ve planned, installed and used your drip irrigation system, you’ll be on your way to more effective and cost-saving irrigation.
|