how to Dig & Run Pipe Under Driveway or Sidewalk
Usually, your yard will contain a few items other than the lawn grass you are trying to keep lush and green. These might include
driveways and sidewalks, which at first glance might appear impossible to overcome. Since pipe must go under these obstacles, you will need to find a way to dig a trench without removing the hard surface. The most efficient and cost effective way to bore under an obstacle is to create a hole using the power of water. Simply attach a jet nozzle to one end of a piece of PVC pipe and a garden hose to the other end with the necessary fittings. The force of the water will create a hole the same exact size as your pvc pipe-through to the
Click on one of the kits below to purchase all of the components needed to make a rugged boring tool... conveniently packaged for either a 3/4" or 1" pvc pipe. |
|
|
other side. Large or small areas can be excavated by adjusting the length of pvc pipe. The tool can be reused again and again by adding a coupler to the pvc pipe.
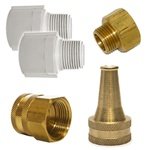
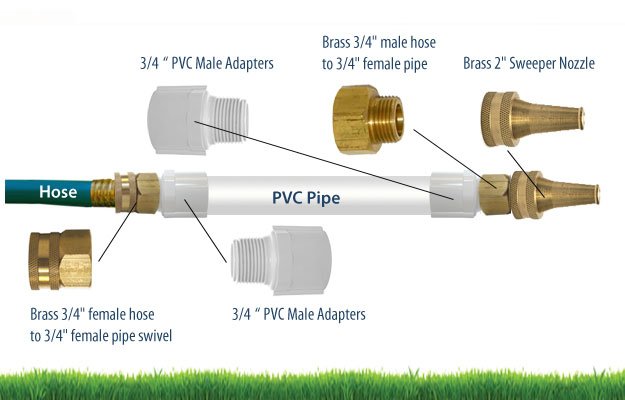
The components needed to bore under an obstacle:
-
Brass 2 inch sweeper nozzle (1 qty)
-
PVC male hose end adapter fitting (2 qty)
-
Brass 3/4 inch female hose to 3/4 inch female pipe swivel (1 qty)
-
Brass 3/4" male hose to 3/4" female pipe(1 qty)
-
PVC glue
-
Garden hose
First dig your trenches on either side of the walk to the depth of the rest of your sprinkler system (usually about 6-12 inches minimum). Now using a PVC pipe cutter, cut the piece of schedule 40 PVC pipe about two to four feet longer than the width of your sidewalk or driveway. Following the directions on the can of PVC glue and glue the male adapters on opposite ends of the pvc pipe. Click here for more information on how to use pvc glue. Next, attach the brass 3/4" female hose to 3/4" female pipe swivel to one of the pvc male adapters. Then attach the brass 3/4" male hose to 3/4" pipe fitting to the other pvc male adapter on the opposite side. Connect your garden hose to female pipe swivel adapter. Connect the male hose/female pipe adapter to your 2 inch sweeper nozzle. Your boring tool is now assembled and ready to go.
Turn on the water. Grab hold of the pipe (fitting the pipe into the trench may intitially require some flexing). Keep the pipe level with the bottom of the trench and jab the boring tool into the soil. The dirt will appear to plug the end of the nozzle, just leave the nozzle in place for 15 to 30 seconds to allow the water to loosen the soil. Pull back the pipe 6 inches to a foot and thrust it into the soil again. Keep repeating this pattern until you have completely bored under your driveway/walkway.
Once the pipe has made it through to the other side you can shut off the water and cut the hose end fittings from both ends of the pipe. Your pvc pipe tool now becomes your irrigation pipe. Attach your fittings to the pipe and continue to assemble your irrigation pipe. Some people prefer a variation of this method and use a larger pvc pie to bore the hole once they have bored through to the other side, they push the actual pipe being used into and through the boring pipe to the other side of the path or driveway. The boring tool then acts like a sleeve. Then the larger "boring" pipe also can be used to hold irrigation or lighting wire. This method allows you to bore just one hole for multiple purposes.

NOTE: Soil that is too hard or rocky may require tunneling either by hand or with a machine that can bore a hole under the sidewalk. You can also contact an irrigation or landscape contractor to do the job, for a list of contractors in your area click here.
Other useful devices to bore under a sidewalk include:
For example, one of the best devices to have if you have a job that requires excavation under a pathway is to use the Sidewalk Sleever. Just follow the simple steps below to see how quick and easy your job could be using this tool. Click here for more info on the Sidewalk Sleever.

You are now done!
Although soil conditions and experience can determine the speed of the installation; in the example here; the pipe was installed in under 60 seconds. Once the pipe is installed; you can glue on to the pipe and continue running pipe; place a smaller size pipe through the installed pipe or you can use the installed pipe as a sleeve for wires. If more sleeves are needed; just simply repeat the steps and install as many pipes as needed. |